6. Leveling Work pieces and Securing with Clamps.

6. Leveling Work pieces and Securing with Clamps.

Why Leveling and Clamping Matters.

In woodworking, leveling ensures that surfaces are even, balanced, and aligned before fastening. If a work piece is not level, you may end up with gaps in joints, crooked assemblies, or unstable furniture.

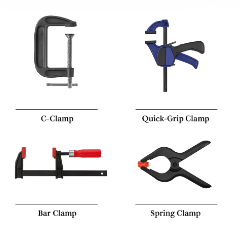
Clamps hold pieces in place while glue dries, fasteners are installed, or adjustments are made. They prevent movement that could cause misalignment. Different clamp types are designed for different jobs:

- C-Clamp: Provides strong, concentrated pressure for small to medium workpieces.

  • Quick-Grip Clamp: Easy one-handed operation, ideal for quick setups.

  • Bar / F-Clamp: Long reach for larger assemblies.

  • Spring Clamp: Lightweight, fast, and portable for temporary holds.

Pro Tip: Always check your work piece for level before and after clamping. Tightening clamps can shift alignment. Tool Identification.
Safety Review: Using Clamps Safely.

Clamps are powerful tools that help hold materials in place while you work, but if used improperly, they can cause damage to your project—or even injury. Understanding how to use clamps safely is an essential part of woodworking.

1. Watch Out for Pinch Points

Many clamps, especially C-clamps and quick-grip clamps, have moving parts that can pinch your fingers if you’re not careful. Always keep your hands clear of the tightening mechanism when adjusting or releasing a clamp.

2. Avoid Over-Tightening

Applying too much pressure can damage wood by leaving dents or even causing cracks. Tighten clamps just enough to hold the work piece securely—no more.

3. Use Protective Pads

Place a small piece of scrap wood, cardboard, or clamp pads between the clamp and your work piece. This prevents clamp jaws from marring or scratching the surface.

4. Check Stability Before Working

Once your clamps are in place, gently try moving the workpiece to ensure it is held securely. If it shifts, readjust and recheck the clamping.

Questions

Why is it important to avoid placing your fingers near clamp tightening mechanisms?

What can happen if you tighten a clamp too much?

Name one material you can use to protect the surface of your work from clamp damage.

What should you do after clamping a work piece to make sure it’s secure?

List two safety tips for using clamps:

1.

2.

Leveling Practice

Scenario: You are joining two boards to make a tabletop.

1. Place the boards side by side on a flat surface.

2. Use a bubble level to check if they are even.

3. Insert shims or adjust position until level.

4. Select an appropriate clamp for the width of your boards.

5. Clamp the boards together.

6. Re-check level and adjust if needed.

Mixed Clamp Challenge

Instructions:

  • Join three pieces of wood into a T` shape.

  • Use at least two different clamp types.

  • Check level at every stage.

Reflection Questions:

1. Which clamp was easier to use? ___________________

2. Which clamp held more securely? ___________________

3. What was the most challenging part of keeping the work pieces level? ___________________

Welcome to Carpentry

Buy nowLearn more

Lesson Plan: Week 1 - Welcome to Carpentry (6 Hours)

  • Safety Video
  • Intro to Carpentry Career
  • 1. Worksheet: 5 Things Carpenters Do
  • 2. Writing Prompt: Why I Want to Learn Carpentry
  • 3. Workshop Safety Contract
  • 4. Safety Quiz: Safe or Unsafe? Untitled
  • 5. Safety Poster.
  • Practice Questions
  • 6. Tool ID Chart.
  • 7. Tool ID. Instructions
  • 8. Introduction to Measurement Units: Inches, Feet, and Fractions
  • 9. Creative Reflection: Draw Your Dream Tool or Workshop Instructions
  • 10. Build Your Carpenter’s Identity Board

Lesson Plan Document: Week 2 - Measure Twice, Cut Once (6 Hours)

  • Tape Measure Video
  • 1.Journal Prompt Why does precision matter in carpentry?
  • 2. Worksheet: Label the Parts of a Tape Measure
  • 3. Practice Activity Students
  • 4. Name That Square
  • 5. Practice Marking 90° Lines
  • Measuring for success video
  • 6. Using a Speed Square and Tape Measure for Layout.
  • 7. Speed Square Labeling Activity
  • 8. Scribe Lines Challenge: Using a Speed Square.
  • Name Plate Video
  • 9. Mini Project – Custom Name Plate.

Lesson Plan Document: Week 3 - Introduction to Hand Tools.

  • Hand Tools Video
  • 1. Tool Identification.
  • 2. Quick Quiz: Hand Tool Know-How.Untitled
  • 3. Review Safety Guidelines.
  • Hand Saw Video
  • 4. Introduction to Handsaws.
  • Hammering Technique Video
  • 5. Hammering Techniques.
  • Nail and Screws Video
  • 6. Leveling Work pieces and Securing with Clamps.
  • 7. Hand Tool Practice.

Lesson Plan Document: Week 4 - Introduction to Power Tools.

  • Introduction to power tools video
  • 1. Identify Safety Symbols and Warnings
  • 2. Safety checklist before plugging in a tool.
  • 3. Quick Activity: Safety Quiz
  • 4. Self-guided lesson: Power Grinder.
  • Part 3: Grinder Safety First
  • 5. Using an Orbital Sander.
  • Power Tools Safety Video
  • 6. Using a Power Drill.
  • 7. Project Builds.
  • 8. Reflect and review.
  • 9. Safety Quiz
  • Sanding Video

Lesson Plan Document: Week 5 - Introduction to Wood Types.

  • Introduction to wood type
  • 1. What is the Best Wood for Each Project?
  • 2. Engineered Woods.
  • 3. Material Budget Challenge.
  • 4. Wood Science Lab.
  • 5. Wood Finish Comparison Board

Lesson Plan Document: Week 6 – Fasteners and Joinery.

  • Fastener Video
  • 1. Fasteners.
  • 2. Fasteners Quick Quiz
  • Joint Video
  • 3. Creative Joinery Sketch Challenge.
  • 4. Build Sample Joints.
  • Glue Test Video
  • 5. Glue Strength Test
  • 6. Project Plan: Build a Small Stool or Crate

Lesson Plan Document: Week 7 – Blueprint Reading & Design.

  • 1. Identify Symbols on a Sample Blueprint
  • 1. Identify Symbols on a Sample Blueprint
  • 7 file

Lesson Plan Document: Week 8 – Framing Basics.

  • Introduction to framing Video
  • 1. Introduction to Framing Concepts.
  • Untit2. Framing Basics Quiz
  • 2. Framing Basics Quiz.
  • 3. Create a Frame.
  • 4. Label the frame.
  • 5. Build a Mini Wall Frame Model.
  • 6. Mini Wall Frame with Window.
  • 7. Framing Terms & Concepts Quiz
  • 8. Framing Basics Challenge – Real-World Stud Spacing Investigation
  • 9. Mini Header Strength Test
  • Introduction to framing

Lesson Plan Document: Week 9 – Finish Carpentry.

  • Trim Cut Video
  • 1. Overview: What Is Finish Carpentry and Why It Matters.
  • 2. Identify trim.
  • 3. Sketch Area.
  • Trim Measure Video
  • 4. Using a Speed Square and Tape Measure for Layout.
  • 1. Scribe Lines Challenge
  • 6. Create a Trim Style Board
  • 7. Draw.
  • Trim Install Video
  • Caulk Video
  • 8. Install Baseboard and Casing Pieces on Project Panel.
  • 9. Install Crown Molding on a Mock-Up Corner

Week 10 - Final Carpentry Project: Build a Small Bench with Shelf

  • Optional Extensions: