5. Glue Strength Test

5. Glue Strength Test

Objective

Conduct a glue strength challenge at home and determine when glue alone is sufficient compared to nails or screws.

Instructions

Follow the instructions below to complete your glue strength test. Use the checklist to keep track of your progress.

✅ Student Checklist

  • Watch the instructional video on how to apply wood glue and prepare test joints (link provided by instructor).

  • Gather materials: 2 small wood pieces, wood glue, clamps (or heavy books), and a way to test strength (weights, books, or hand pull).

  • Apply glue to join two pieces of wood. Clamp and allow to dry for at least 30 minutes.

  • Test the strength of the joint using weights or by carefully pulling the pieces apart.

  • Take a photo or video of your test.

  • Complete the reflection questions and upload your results to the class folder.

How to Apply Wood Glue

Follow these steps to apply wood glue properly and create strong joints:

1. Dry Fit First – Assemble the pieces without glue to check fit and alignment.

2. Surface Prep – Ensure surfaces are clean, dry, and smooth. Sand if necessary.

3. Apply the Glue – Apply a thin, even bead of glue and spread it across the surface.

4. Clamp the Joint – Use clamps with moderate pressure; clean off excess glue with a damp cloth.

5. Wait for Curing – Clamp for at least 30 minutes (longer for strong bonds). Full cure: up to 24 hours.

Preparing Test Joints

Use test joints to practice gluing techniques or check glue strength before final assembly.

Common Test Joint Types:

  • Edge-to-Edge Joint: Glue long edges together to create a wider panel.

  • Butt Joint: One board glued flat to another’s face or edge.

  • Miter Joint: Two angled cuts (e.g., 45°) joined together.

  • Lap Joint: One piece overlaps another partially to increase surface contact.

    Steps to Prepare Test Joints:

1. Cut small wood samples (4–6 inches) for each type of joint.

2. Apply glue and clamp each joint as described above.

3. Label each joint type clearly.

4. After curing, test strength by gently pulling or applying pressure.

Reflection Questions

1. How well did your glued joint hold up during testing?

2. Did it break easily or hold strong under pressure?

3. In what situations do you think glue alone is enough?

4. When would you recommend adding screws or nails?

Project Rubric: Wood Glue and Joint Preparation

Use this rubric to assess student understanding and execution of glued wood joints.
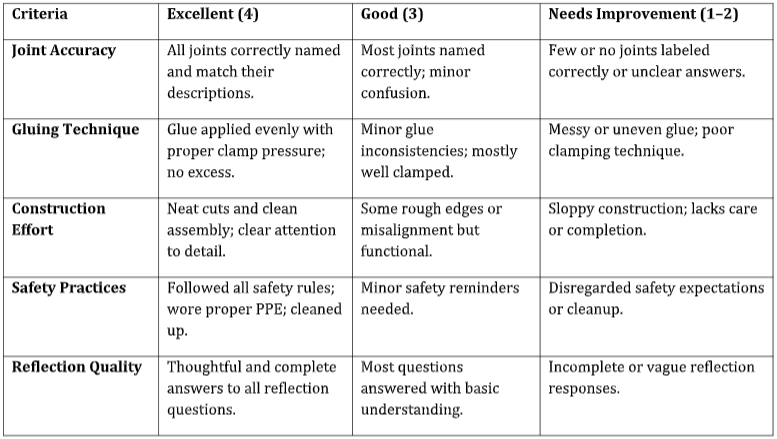
Total Score: ____ / 20

Comments:

Welcome to Carpentry

Buy nowLearn more

Lesson Plan: Week 1 - Welcome to Carpentry (6 Hours)

  • Safety Video
  • Intro to Carpentry Career
  • 1. Worksheet: 5 Things Carpenters Do
  • 2. Writing Prompt: Why I Want to Learn Carpentry
  • 3. Workshop Safety Contract
  • 4. Safety Quiz: Safe or Unsafe? Untitled
  • 5. Safety Poster.
  • Practice Questions
  • 6. Tool ID Chart.
  • 7. Tool ID. Instructions
  • 8. Introduction to Measurement Units: Inches, Feet, and Fractions
  • 9. Creative Reflection: Draw Your Dream Tool or Workshop Instructions
  • 10. Build Your Carpenter’s Identity Board

Lesson Plan Document: Week 2 - Measure Twice, Cut Once (6 Hours)

  • Tape Measure Video
  • 1.Journal Prompt Why does precision matter in carpentry?
  • 2. Worksheet: Label the Parts of a Tape Measure
  • 3. Practice Activity Students
  • 4. Name That Square
  • 5. Practice Marking 90° Lines
  • Measuring for success video
  • 6. Using a Speed Square and Tape Measure for Layout.
  • 7. Speed Square Labeling Activity
  • 8. Scribe Lines Challenge: Using a Speed Square.
  • Name Plate Video
  • 9. Mini Project – Custom Name Plate.

Lesson Plan Document: Week 3 - Introduction to Hand Tools.

  • Hand Tools Video
  • 1. Tool Identification.
  • 2. Quick Quiz: Hand Tool Know-How.Untitled
  • 3. Review Safety Guidelines.
  • Hand Saw Video
  • 4. Introduction to Handsaws.
  • Hammering Technique Video
  • 5. Hammering Techniques.
  • Nail and Screws Video
  • 6. Leveling Work pieces and Securing with Clamps.
  • 7. Hand Tool Practice.

Lesson Plan Document: Week 4 - Introduction to Power Tools.

  • Introduction to power tools video
  • 1. Identify Safety Symbols and Warnings
  • 2. Safety checklist before plugging in a tool.
  • 3. Quick Activity: Safety Quiz
  • 4. Self-guided lesson: Power Grinder.
  • Part 3: Grinder Safety First
  • 5. Using an Orbital Sander.
  • Power Tools Safety Video
  • 6. Using a Power Drill.
  • 7. Project Builds.
  • 8. Reflect and review.
  • 9. Safety Quiz
  • Sanding Video

Lesson Plan Document: Week 5 - Introduction to Wood Types.

  • Introduction to wood type
  • 1. What is the Best Wood for Each Project?
  • 2. Engineered Woods.
  • 3. Material Budget Challenge.
  • 4. Wood Science Lab.
  • 5. Wood Finish Comparison Board

Lesson Plan Document: Week 6 – Fasteners and Joinery.

  • Fastener Video
  • 1. Fasteners.
  • 2. Fasteners Quick Quiz
  • Joint Video
  • 3. Creative Joinery Sketch Challenge.
  • 4. Build Sample Joints.
  • Glue Test Video
  • 5. Glue Strength Test
  • 6. Project Plan: Build a Small Stool or Crate

Lesson Plan Document: Week 7 – Blueprint Reading & Design.

  • 1. Identify Symbols on a Sample Blueprint
  • 1. Identify Symbols on a Sample Blueprint
  • 7 file

Lesson Plan Document: Week 8 – Framing Basics.

  • Introduction to framing Video
  • 1. Introduction to Framing Concepts.
  • Untit2. Framing Basics Quiz
  • 2. Framing Basics Quiz.
  • 3. Create a Frame.
  • 4. Label the frame.
  • 5. Build a Mini Wall Frame Model.
  • 6. Mini Wall Frame with Window.
  • 7. Framing Terms & Concepts Quiz
  • 8. Framing Basics Challenge – Real-World Stud Spacing Investigation
  • 9. Mini Header Strength Test
  • Introduction to framing

Lesson Plan Document: Week 9 – Finish Carpentry.

  • Trim Cut Video
  • 1. Overview: What Is Finish Carpentry and Why It Matters.
  • 2. Identify trim.
  • 3. Sketch Area.
  • Trim Measure Video
  • 4. Using a Speed Square and Tape Measure for Layout.
  • 1. Scribe Lines Challenge
  • 6. Create a Trim Style Board
  • 7. Draw.
  • Trim Install Video
  • Caulk Video
  • 8. Install Baseboard and Casing Pieces on Project Panel.
  • 9. Install Crown Molding on a Mock-Up Corner

Week 10 - Final Carpentry Project: Build a Small Bench with Shelf

  • Optional Extensions: