5. Using an Orbital Sander.

5. Using an Orbital Sander.

Objective

Students will learn the purpose, safety protocols, and basic use of an orbital sander through guided content and a hands-on sanding task.

Lesson Structure

Part 1: Introduction Reading

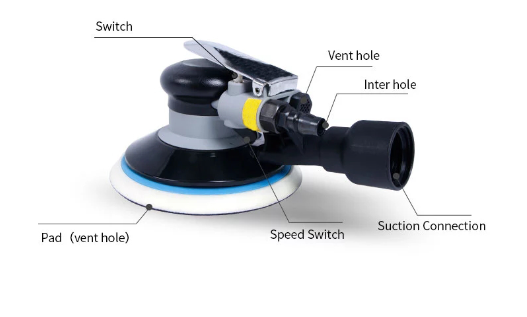
An orbital sander is a handheld power tool used to smooth surfaces using a rapidly rotating sanding pad that moves in small, circular motions. It’s commonly used in woodworking to smooth wood surfaces, remove old paint or finishes, and prepare material for staining or sealing. Choosing the right grit sandpaper is essential—coarse grits (60–80) are best for heavy removal, while finer grits (120–220) are used for finishing. Proper personal protective equipment (PPE) is important when operating an orbital sander, including safety goggles to protect your eyes, a dust mask to avoid inhaling fine particles, and ear protection to guard against prolonged noise exposure. Always prioritize safety: keep hands away from the sanding pad during operation, use clamps or a vice to secure yourworkpiece, and always unplug the sander before changing discs or making adjustments.

Part 2: Tool Walkthrough

Activity:

  • Examine an orbital sander

  • Identify the parts.

Part 3: Safety Checklist & Practice Setup

Activity:

  • Complete a Safety Checklist before sanding:

  • PPE on

  • Disc attached securely

  • Wood clamped

  • Area clean and ventilated

  • Cords out of path

Part 4: Hands-On Practice

Task:

  • Sand a small board (e.g., 6 x 12)

  • Start with coarse grit (80), finish with fine grit (150-220)

  • Keep sander flat, move in slow circular motions

  • Do not press down—let the sander do the work

Goal: Achieve a smooth, even surface without swirls.

Part 5: Reflection

Activity:

  • Write in your notebook:

  • What went well?

  • What was difficult?

  • One tip they’d share with a peer

Printable Safety Checklist

☐ PPE on (goggles, dust mask, ear protection)

☐ Sanding disc securely attached

☐ Workpiece clamped or secured

☐ Area clean and ventilated

☐ Cords clear and untangled

☐ Tool inspected for damage

☐ Understanding of the ON/OFF switch

☐ Dust bag or vacuum attached (if available)

☐ Practiced grip and stance

Welcome to Carpentry

Buy nowLearn more

Lesson Plan: Week 1 - Welcome to Carpentry (6 Hours)

  • Safety Video
  • Intro to Carpentry Career
  • 1. Worksheet: 5 Things Carpenters Do
  • 2. Writing Prompt: Why I Want to Learn Carpentry
  • 3. Workshop Safety Contract
  • 4. Safety Quiz: Safe or Unsafe? Untitled
  • 5. Safety Poster.
  • Practice Questions
  • 6. Tool ID Chart.
  • 7. Tool ID. Instructions
  • 8. Introduction to Measurement Units: Inches, Feet, and Fractions
  • 9. Creative Reflection: Draw Your Dream Tool or Workshop Instructions
  • 10. Build Your Carpenter’s Identity Board

Lesson Plan Document: Week 2 - Measure Twice, Cut Once (6 Hours)

  • Tape Measure Video
  • 1.Journal Prompt Why does precision matter in carpentry?
  • 2. Worksheet: Label the Parts of a Tape Measure
  • 3. Practice Activity Students
  • 4. Name That Square
  • 5. Practice Marking 90° Lines
  • Measuring for success video
  • 6. Using a Speed Square and Tape Measure for Layout.
  • 7. Speed Square Labeling Activity
  • 8. Scribe Lines Challenge: Using a Speed Square.
  • Name Plate Video
  • 9. Mini Project – Custom Name Plate.

Lesson Plan Document: Week 3 - Introduction to Hand Tools.

  • Hand Tools Video
  • 1. Tool Identification.
  • 2. Quick Quiz: Hand Tool Know-How.Untitled
  • 3. Review Safety Guidelines.
  • Hand Saw Video
  • 4. Introduction to Handsaws.
  • Hammering Technique Video
  • 5. Hammering Techniques.
  • Nail and Screws Video
  • 6. Leveling Work pieces and Securing with Clamps.
  • 7. Hand Tool Practice.

Lesson Plan Document: Week 4 - Introduction to Power Tools.

  • Introduction to power tools video
  • 1. Identify Safety Symbols and Warnings
  • 2. Safety checklist before plugging in a tool.
  • 3. Quick Activity: Safety Quiz
  • 4. Self-guided lesson: Power Grinder.
  • Part 3: Grinder Safety First
  • 5. Using an Orbital Sander.
  • Power Tools Safety Video
  • 6. Using a Power Drill.
  • 7. Project Builds.
  • 8. Reflect and review.
  • 9. Safety Quiz
  • Sanding Video

Lesson Plan Document: Week 5 - Introduction to Wood Types.

  • Introduction to wood type
  • 1. What is the Best Wood for Each Project?
  • 2. Engineered Woods.
  • 3. Material Budget Challenge.
  • 4. Wood Science Lab.
  • 5. Wood Finish Comparison Board

Lesson Plan Document: Week 6 – Fasteners and Joinery.

  • Fastener Video
  • 1. Fasteners.
  • 2. Fasteners Quick Quiz
  • Joint Video
  • 3. Creative Joinery Sketch Challenge.
  • 4. Build Sample Joints.
  • Glue Test Video
  • 5. Glue Strength Test
  • 6. Project Plan: Build a Small Stool or Crate

Lesson Plan Document: Week 7 – Blueprint Reading & Design.

  • 1. Identify Symbols on a Sample Blueprint
  • 1. Identify Symbols on a Sample Blueprint
  • 7 file

Lesson Plan Document: Week 8 – Framing Basics.

  • Introduction to framing Video
  • 1. Introduction to Framing Concepts.
  • Untit2. Framing Basics Quiz
  • 2. Framing Basics Quiz.
  • 3. Create a Frame.
  • 4. Label the frame.
  • 5. Build a Mini Wall Frame Model.
  • 6. Mini Wall Frame with Window.
  • 7. Framing Terms & Concepts Quiz
  • 8. Framing Basics Challenge – Real-World Stud Spacing Investigation
  • 9. Mini Header Strength Test
  • Introduction to framing

Lesson Plan Document: Week 9 – Finish Carpentry.

  • Trim Cut Video
  • 1. Overview: What Is Finish Carpentry and Why It Matters.
  • 2. Identify trim.
  • 3. Sketch Area.
  • Trim Measure Video
  • 4. Using a Speed Square and Tape Measure for Layout.
  • 1. Scribe Lines Challenge
  • 6. Create a Trim Style Board
  • 7. Draw.
  • Trim Install Video
  • Caulk Video
  • 8. Install Baseboard and Casing Pieces on Project Panel.
  • 9. Install Crown Molding on a Mock-Up Corner

Week 10 - Final Carpentry Project: Build a Small Bench with Shelf

  • Optional Extensions: