1. Introduction to Framing Concepts.

1. Introduction to Framing Concepts.

1. Introduction to Framing Concepts.

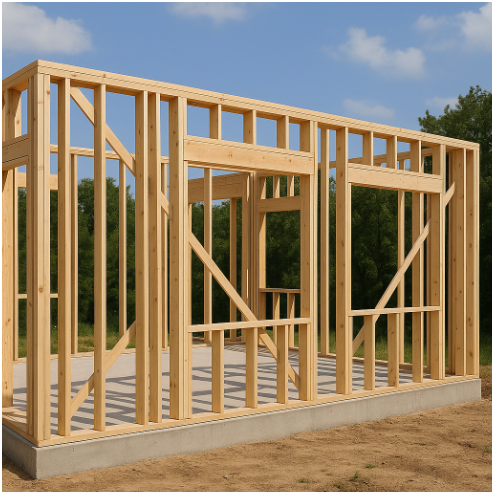
Framing is the structural backbone of any building. It gives the walls, floors, and roof their shape and support. Understanding the parts of a wall frame is essential for anyone learning construction or carpentry.

Studs

Studs are vertical pieces of lumber that form the main structure of a wall. They’re usually spaced evenly, most commonly 16 inches apart, to provide strong and stable support. Studs are what the drywall or wall sheathing attaches to.

Plates

At the top and bottom of the wall frame are long horizontal boards called plates. The top plate supports ceiling joists or roof trusses, while the bottom plate anchors the wall to the floor. Together, plates connect all the studs and form the basic frame.

Headers

When a window or door is installed, the studs that would normally go there are cut. A header is a strong, horizontal beam placed above the opening to carry the load that the missing studs would have supported.

Trimmer Studs (Jack Studs)

To support headers, trimmer studs are installed underneath them on each side of the opening.

They’re shorter than regular studs and work with king studs to frame around windows and doors.

Other Key Terms

  • King Stud: A full-length stud that runs from the bottom plate to the top plate and helps support the trimmer stud.

  • Sill Plate: The bottom piece of a window frame that supports the window itself and sits between the trimmers.

Framing must be done carefully, as it determines the strength, layout, and accuracy of everything built on top of it.
Welcome to Carpentry

Buy nowLearn more

Lesson Plan: Week 1 - Welcome to Carpentry (6 Hours)

  • Safety Video
  • Intro to Carpentry Career
  • 1. Worksheet: 5 Things Carpenters Do
  • 2. Writing Prompt: Why I Want to Learn Carpentry
  • 3. Workshop Safety Contract
  • 4. Safety Quiz: Safe or Unsafe? Untitled
  • 5. Safety Poster.
  • Practice Questions
  • 6. Tool ID Chart.
  • 7. Tool ID. Instructions
  • 8. Introduction to Measurement Units: Inches, Feet, and Fractions
  • 9. Creative Reflection: Draw Your Dream Tool or Workshop Instructions
  • 10. Build Your Carpenter’s Identity Board

Lesson Plan Document: Week 2 - Measure Twice, Cut Once (6 Hours)

  • Tape Measure Video
  • 1.Journal Prompt Why does precision matter in carpentry?
  • 2. Worksheet: Label the Parts of a Tape Measure
  • 3. Practice Activity Students
  • 4. Name That Square
  • 5. Practice Marking 90° Lines
  • Measuring for success video
  • 6. Using a Speed Square and Tape Measure for Layout.
  • 7. Speed Square Labeling Activity
  • 8. Scribe Lines Challenge: Using a Speed Square.
  • Name Plate Video
  • 9. Mini Project – Custom Name Plate.

Lesson Plan Document: Week 3 - Introduction to Hand Tools.

  • Hand Tools Video
  • 1. Tool Identification.
  • 2. Quick Quiz: Hand Tool Know-How.Untitled
  • 3. Review Safety Guidelines.
  • Hand Saw Video
  • 4. Introduction to Handsaws.
  • Hammering Technique Video
  • 5. Hammering Techniques.
  • Nail and Screws Video
  • 6. Leveling Work pieces and Securing with Clamps.
  • 7. Hand Tool Practice.

Lesson Plan Document: Week 4 - Introduction to Power Tools.

  • Introduction to power tools video
  • 1. Identify Safety Symbols and Warnings
  • 2. Safety checklist before plugging in a tool.
  • 3. Quick Activity: Safety Quiz
  • 4. Self-guided lesson: Power Grinder.
  • Part 3: Grinder Safety First
  • 5. Using an Orbital Sander.
  • Power Tools Safety Video
  • 6. Using a Power Drill.
  • 7. Project Builds.
  • 8. Reflect and review.
  • 9. Safety Quiz
  • Sanding Video

Lesson Plan Document: Week 5 - Introduction to Wood Types.

  • Introduction to wood type
  • 1. What is the Best Wood for Each Project?
  • 2. Engineered Woods.
  • 3. Material Budget Challenge.
  • 4. Wood Science Lab.
  • 5. Wood Finish Comparison Board

Lesson Plan Document: Week 6 – Fasteners and Joinery.

  • Fastener Video
  • 1. Fasteners.
  • 2. Fasteners Quick Quiz
  • Joint Video
  • 3. Creative Joinery Sketch Challenge.
  • 4. Build Sample Joints.
  • Glue Test Video
  • 5. Glue Strength Test
  • 6. Project Plan: Build a Small Stool or Crate

Lesson Plan Document: Week 7 – Blueprint Reading & Design.

  • 1. Identify Symbols on a Sample Blueprint
  • 1. Identify Symbols on a Sample Blueprint
  • 7 file

Lesson Plan Document: Week 8 – Framing Basics.

  • Introduction to framing Video
  • 1. Introduction to Framing Concepts.
  • Untit2. Framing Basics Quiz
  • 2. Framing Basics Quiz.
  • 3. Create a Frame.
  • 4. Label the frame.
  • 5. Build a Mini Wall Frame Model.
  • 6. Mini Wall Frame with Window.
  • 7. Framing Terms & Concepts Quiz
  • 8. Framing Basics Challenge – Real-World Stud Spacing Investigation
  • 9. Mini Header Strength Test
  • Introduction to framing

Lesson Plan Document: Week 9 – Finish Carpentry.

  • Trim Cut Video
  • 1. Overview: What Is Finish Carpentry and Why It Matters.
  • 2. Identify trim.
  • 3. Sketch Area.
  • Trim Measure Video
  • 4. Using a Speed Square and Tape Measure for Layout.
  • 1. Scribe Lines Challenge
  • 6. Create a Trim Style Board
  • 7. Draw.
  • Trim Install Video
  • Caulk Video
  • 8. Install Baseboard and Casing Pieces on Project Panel.
  • 9. Install Crown Molding on a Mock-Up Corner

Week 10 - Final Carpentry Project: Build a Small Bench with Shelf

  • Optional Extensions: