8. Introduction to Measurement Units: Inches, Feet, and Fractions

8. Introduction to Measurement Units: Inches, Feet, and Fractions

8. Introduction to Measurement Units: Inches, Feet, and Fractions

1. What Is an Inch?

An inch (in) is a small unit of length. It's commonly used to measure short distances like the width of a board or the length of a screw. There are 12 inches in one foot.

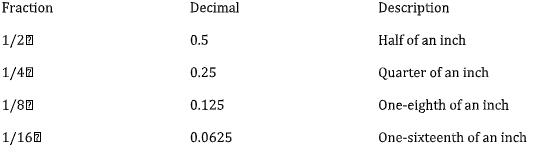
Most tape measures break inches down into fractions (like 1/2,1/4, 1/8,1/16) to allow for very precise measurements.

2. What Is a Foot?

A foot (ft or ′) is a bigger unit of measurement. One foot equals 12 inches. For example, a standard 2x4 board might be 8 feet long, or 8′ = 96 inches.

Feet are often used when measuring walls, floors, or other larger objects.

3. Understanding Fractions on a Tape Measure

Fractions help you measure parts of an inch. Here's a quick breakdown:
Quick Tips

  • 1 foot = 12 inches

  • Always start measuring from the zero mark on the tape, not the metal tab end.

  • Learn to recognize fractions visually—this helps speed up your work.

Welcome to Carpentry

Buy nowLearn more

Lesson Plan: Week 1 - Welcome to Carpentry (6 Hours)

  • Safety Video
  • Intro to Carpentry Career
  • 1. Worksheet: 5 Things Carpenters Do
  • 2. Writing Prompt: Why I Want to Learn Carpentry
  • 3. Workshop Safety Contract
  • 4. Safety Quiz: Safe or Unsafe? Untitled
  • 5. Safety Poster.
  • Practice Questions
  • 6. Tool ID Chart.
  • 7. Tool ID. Instructions
  • 8. Introduction to Measurement Units: Inches, Feet, and Fractions
  • 9. Creative Reflection: Draw Your Dream Tool or Workshop Instructions
  • 10. Build Your Carpenter’s Identity Board

Lesson Plan Document: Week 2 - Measure Twice, Cut Once (6 Hours)

  • Tape Measure Video
  • 1.Journal Prompt Why does precision matter in carpentry?
  • 2. Worksheet: Label the Parts of a Tape Measure
  • 3. Practice Activity Students
  • 4. Name That Square
  • 5. Practice Marking 90° Lines
  • Measuring for success video
  • 6. Using a Speed Square and Tape Measure for Layout.
  • 7. Speed Square Labeling Activity
  • 8. Scribe Lines Challenge: Using a Speed Square.
  • Name Plate Video
  • 9. Mini Project – Custom Name Plate.

Lesson Plan Document: Week 3 - Introduction to Hand Tools.

  • Hand Tools Video
  • 1. Tool Identification.
  • 2. Quick Quiz: Hand Tool Know-How.Untitled
  • 3. Review Safety Guidelines.
  • Hand Saw Video
  • 4. Introduction to Handsaws.
  • Hammering Technique Video
  • 5. Hammering Techniques.
  • Nail and Screws Video
  • 6. Leveling Work pieces and Securing with Clamps.
  • 7. Hand Tool Practice.

Lesson Plan Document: Week 4 - Introduction to Power Tools.

  • Introduction to power tools video
  • 1. Identify Safety Symbols and Warnings
  • 2. Safety checklist before plugging in a tool.
  • 3. Quick Activity: Safety Quiz
  • 4. Self-guided lesson: Power Grinder.
  • Part 3: Grinder Safety First
  • 5. Using an Orbital Sander.
  • Power Tools Safety Video
  • 6. Using a Power Drill.
  • 7. Project Builds.
  • 8. Reflect and review.
  • 9. Safety Quiz
  • Sanding Video

Lesson Plan Document: Week 5 - Introduction to Wood Types.

  • Introduction to wood type
  • 1. What is the Best Wood for Each Project?
  • 2. Engineered Woods.
  • 3. Material Budget Challenge.
  • 4. Wood Science Lab.
  • 5. Wood Finish Comparison Board

Lesson Plan Document: Week 6 – Fasteners and Joinery.

  • Fastener Video
  • 1. Fasteners.
  • 2. Fasteners Quick Quiz
  • Joint Video
  • 3. Creative Joinery Sketch Challenge.
  • 4. Build Sample Joints.
  • Glue Test Video
  • 5. Glue Strength Test
  • 6. Project Plan: Build a Small Stool or Crate

Lesson Plan Document: Week 7 – Blueprint Reading & Design.

  • 1. Identify Symbols on a Sample Blueprint
  • 1. Identify Symbols on a Sample Blueprint
  • 7 file

Lesson Plan Document: Week 8 – Framing Basics.

  • Introduction to framing Video
  • 1. Introduction to Framing Concepts.
  • Untit2. Framing Basics Quiz
  • 2. Framing Basics Quiz.
  • 3. Create a Frame.
  • 4. Label the frame.
  • 5. Build a Mini Wall Frame Model.
  • 6. Mini Wall Frame with Window.
  • 7. Framing Terms & Concepts Quiz
  • 8. Framing Basics Challenge – Real-World Stud Spacing Investigation
  • 9. Mini Header Strength Test
  • Introduction to framing

Lesson Plan Document: Week 9 – Finish Carpentry.

  • Trim Cut Video
  • 1. Overview: What Is Finish Carpentry and Why It Matters.
  • 2. Identify trim.
  • 3. Sketch Area.
  • Trim Measure Video
  • 4. Using a Speed Square and Tape Measure for Layout.
  • 1. Scribe Lines Challenge
  • 6. Create a Trim Style Board
  • 7. Draw.
  • Trim Install Video
  • Caulk Video
  • 8. Install Baseboard and Casing Pieces on Project Panel.
  • 9. Install Crown Molding on a Mock-Up Corner

Week 10 - Final Carpentry Project: Build a Small Bench with Shelf

  • Optional Extensions: