9. Install Crown Molding on a Mock-Up Corner
9. Install Crown Molding on a Mock-Up Corner
Objective:
Students will learn how to measure, cut, and install crown molding on a 90° mock-up corner using miter and coping techniques.
Materials Needed:
Crown molding (wood or MDF), enough for two inside corner pieces
2x2 or 2 x4 mock-up corner frame (2 walls joined at 90°)
Miter saw (or miter box and hand saw)
Tape measure and pencil
Wood glue
Finish nails or brad nails and nailer
Sandpaper
Caulk and putty (optional)
Paint or finish (optional)
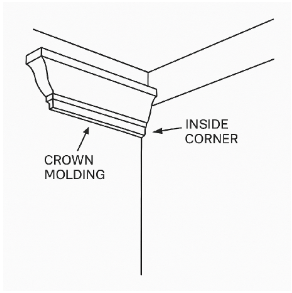
Instructions.
1. Prep the Mock-Up Frame:
Use two 2 x2 boards or panels joined at a 90° angle to simulate an inside corner.
2. Measure for Crown Molding:
Measure the top of each wall and mark crown molding length on the back side (the wall side).
3. Cut the Molding:
Use a miter saw set to 45° to cut inside corners. Optionally, use a coping saw to cope one end of the molding for a tighter joint.
4. Test Fit:
Dry fit both pieces against the mock-up wall to check for proper fit and clean joints.
5. Attach Molding:
Apply wood glue along contact surfaces. Nail the crown into place along the top and bottom edges.
6. Finishing:
Fill any gaps or nail holes with wood putty or caulk. Sand smooth, then paint or stain as desired.
7. Present and Reflect:
Show your completed corner and explain your process and how you ensured clean cuts and joints.
Reflection Questions:
What made aligning and cutting the crown molding challenging?
Did you use a mitered or coped joint? Why?
How can you ensure tight-fitting joints in future projects?
Project Rubric:
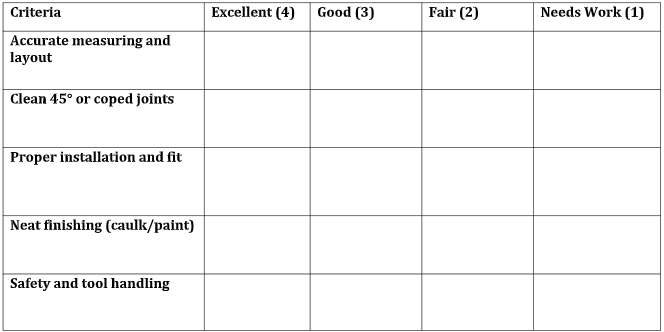
Score /20