8. Install Baseboard and Casing Pieces on Project Panel.
Welcome to Carpentry
Lesson Plan: Week 1 - Welcome to Carpentry (6 Hours)
Lesson Plan Document: Week 2 - Measure Twice, Cut Once (6 Hours)
Lesson Plan Document: Week 3 - Introduction to Hand Tools.
Lesson Plan Document: Week 4 - Introduction to Power Tools.
Lesson Plan Document: Week 5 - Introduction to Wood Types.
Lesson Plan Document: Week 6 – Fasteners and Joinery.
Lesson Plan Document: Week 7 – Blueprint Reading & Design.
Lesson Plan Document: Week 8 – Framing Basics.
Lesson Plan Document: Week 9 – Finish Carpentry.
Week 10 - Final Carpentry Project: Build a Small Bench with Shelf
8. Install Baseboard and Casing Pieces on Project Panel.
Objective
Students will accurately measure, cut, and install baseboard and casing pieces on a mock project panel to simulate interior finish carpentry installation.
Materials Needed
Pre-cut or scrap lengths of baseboard and casing trim
Mock panel or plywood board (approx. 24" x 24")
Miter saw or hand saw
Wood glue or finish nails
Tape measure, pencil, speed square
Optional: caulk, filler, and sandpaper for finishing
Instructions
Measure the length of the bottom edge of the panel for your baseboard.
Cut the baseboard piece to fit using a straight 90° cut.
Measure and mark for casing pieces to simulate a window or door trim set on the panel.
Cut casing pieces using 45° angles at the corners.
Attach all trim pieces securely to the panel using glue and/or finish nails.
(Optional) Fill nail holes and seams, then sand for a smooth finish.
Label your panel with your name on the back for evaluation.
Assessment Rubric (20 points)
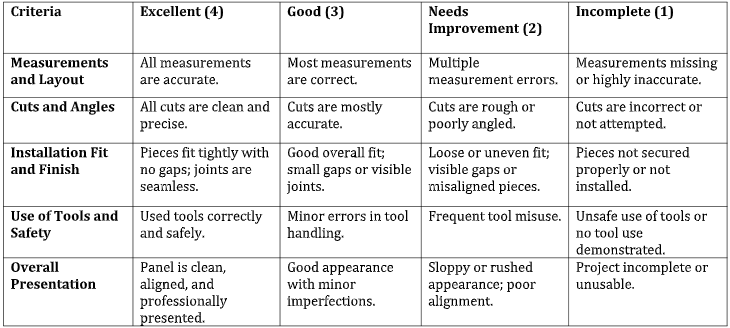
Total Score: /20