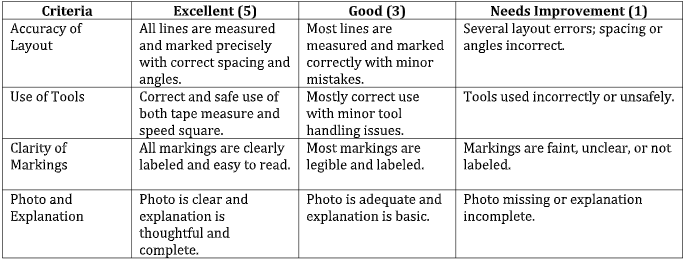
6. Using a Speed Square and Tape Measure for Layout.
6. Using a Speed Square and Tape Measure for Layout.
Objective
Practice using a speed square and tape measure to perform common carpentry layout tasks. This activity builds hands-on skills in marking straight lines, angles, and stud spacing.
Materials Needed
Speed square (or printed paper version)
Tape measure (or printed tape measure strip)
Pencil or pen
2 x2 wood panel, cardboard, or foam board
Instructions
1. Measure and mark three vertical lines spaced 16 inches apart across your board.
2. Use the speed square to ensure each line is square (90°) to the bottom edge.
3. From the top right corner, use the speed square to mark a 45° diagonal line.
4. Label your lines: A, B, C (the 16OC lines) and D (the 45° angle).
5. Take a photo of your board showing all layout marks.
6. Write 2–3 sentences explaining how you used the speed square and tape measure.
Submission
Share the photo with your instructor/parent for review.