5. Glue Strength Test
Objective
Conduct a glue strength challenge at home and determine when glue alone is sufficient compared to nails or screws.
Instructions
Follow the instructions below to complete your glue strength test. Use the checklist to keep track of your progress.
✅ Student Checklist
Watch the instructional video on how to apply wood glue and prepare test joints (link provided by instructor).
Gather materials: 2 small wood pieces, wood glue, clamps (or heavy books), and a way to test strength (weights, books, or hand pull).
Apply glue to join two pieces of wood. Clamp and allow to dry for at least 30 minutes.
Test the strength of the joint using weights or by carefully pulling the pieces apart.
Take a photo or video of your test.
Complete the reflection questions and upload your results to the class folder.
How to Apply Wood Glue
Follow these steps to apply wood glue properly and create strong joints:
1. Dry Fit First – Assemble the pieces without glue to check fit and alignment.
2. Surface Prep – Ensure surfaces are clean, dry, and smooth. Sand if necessary.
3. Apply the Glue – Apply a thin, even bead of glue and spread it across the surface.
4. Clamp the Joint – Use clamps with moderate pressure; clean off excess glue with a damp cloth.
5. Wait for Curing – Clamp for at least 30 minutes (longer for strong bonds). Full cure: up to 24 hours.
Preparing Test Joints
Use test joints to practice gluing techniques or check glue strength before final assembly.
Common Test Joint Types:
Edge-to-Edge Joint: Glue long edges together to create a wider panel.
Butt Joint: One board glued flat to another’s face or edge.
Miter Joint: Two angled cuts (e.g., 45°) joined together.
-
Lap Joint: One piece overlaps another partially to increase surface contact.
Steps to Prepare Test Joints:
1. Cut small wood samples (4–6 inches) for each type of joint.
2. Apply glue and clamp each joint as described above.
3. Label each joint type clearly.
4. After curing, test strength by gently pulling or applying pressure.
Reflection Questions
1. How well did your glued joint hold up during testing?
2. Did it break easily or hold strong under pressure?
3. In what situations do you think glue alone is enough?
4. When would you recommend adding screws or nails?
Project Rubric: Wood Glue and Joint Preparation
Use this rubric to assess student understanding and execution of glued wood joints.
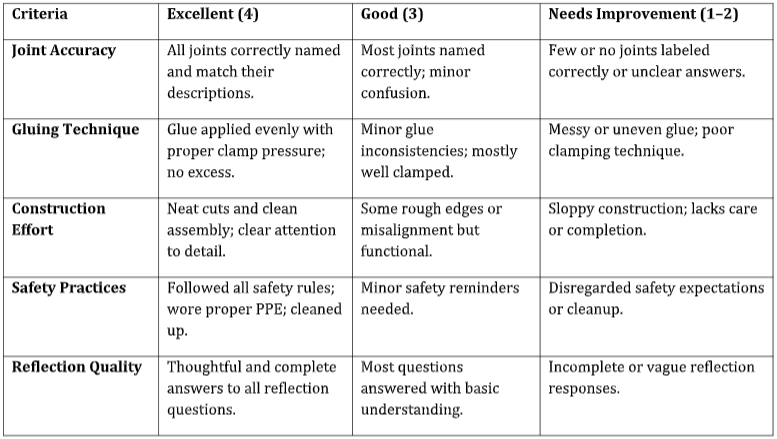
Total Score: ____ / 20
Comments: