6. Mini Wall Frame with Window.
6. Mini Wall Frame with Window.
Project Overview
In this project, you will build a miniature model of a framed wall section with a window opening.
You will apply your understanding of wall framing components and practice basic measurement
and building skills.
Materials Needed
1& x 2&or 1& x 3& wood strips (to simulate 2x4s, cut to scale)
Wood glue or small nails
Measuring tape or ruler
Saw (hand or miter)
Sandpaper
Safety gear (goggles, gloves)
Pencil
Clamp (optional)
Steps
1. Measure and cut all framing parts to scale (18 x 12 overall frame, 3 stud spacing).
2. Lay out the bottom and top plates and mark stud locations.
3. Assemble the outer frame first using glue or nails.
4. Insert vertical studs with proper spacing.
5. Construct the window frame: add header, trimmers, rough sill, and cripples.
6. Ensure structure is square and secure all joints.
7. Optional: label parts or paint for presentation.
8. Take photos of your final model.
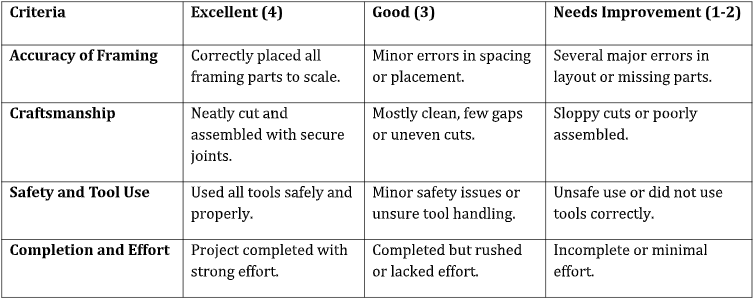
Framing Project Rubric
Score