9. Mini Project – Custom Name Plate.
Overview
In this 2-hour lesson, students will apply measurement and layout skills to create a personalized wooden name plate. This hands-on project reinforces accuracy in measuring, marking, and basic tool handling.
Objectives
Apply measurement and layout skills accurately on wood.
Use a speed square and tape measure to lay out project dimensions.
Practice marking consistent letter spacing.
Create a customized wood name plate.
Materials Needed
1x6 board (cut to 12” length)
Tape measure
Speed square
Pencil
Lettering stencils or printed name template
Sandpaper
Wood stain or paint (optional)
Safety gear
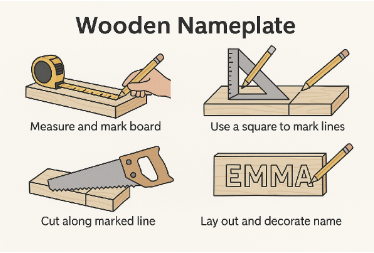
Instructions
1. Begin by sanding your wood board to smooth all edges and surfaces.
2. Use a tape measure to find and mark the center of the board lengthwise and widthwise.
3. Use a speed square to draw a straight centerline horizontally across the board.
4. Decide where your name will go. Measure the full length of your name using stencils or a printed template.
5. Center the name horizontally by dividing the remaining space on each side equally.
6. Use the tape measure and speed square to evenly space out each letter and lightly mark guide lines with a pencil.
7. Carefully trace your name onto the board using stencils or the printed template.
8. Optional: Outline the letters using a carving tool, wood burner, or marker. You can also paint or stain your board.
9. Let any paint or finish dry before handling.
10. Clean your work area and prepare to share your finished project with the group.
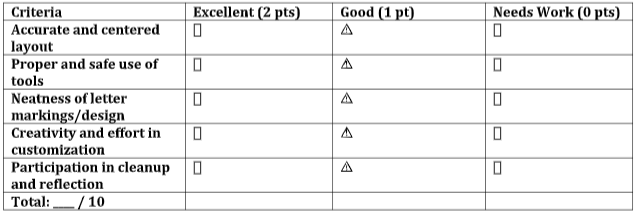
Rubric: Custom Name Plate Project (10 Points)