5. Hammering Techniques.
Learning Objectives
- Understand the difference between nails and screws and their uses
- Practice driving fasteners in straight, evenly spaced rows
- Learn to set nails and screws flush and secure
Part 1: Video Introduction
Watch this: https://www.youtube.com/watch?v=5-PlR8tf84c
While Watching, Ask Yourself:
- Why would I choose a screw instead of a nail?
- How do pros ensure fasteners are flush and straight?
Part 2: Build a Nail & Screw Practice Board
Materials Needed:
1 piece of 1x6 or 1x8 scrap wood (≈ 12" long)
10+ nails (finishing or common)
10+ wood screws (1½–2½ inch)
Hammer
Screwdriver or drill-drive
Ruler or tape measure
Pencil
Safety goggles
Instructions:
Draw two parallel lines across the board (one for nails, one for screws).
Mark dots every 1 inch to space fasteners evenly.
Hammer nails along one line—each should be straight, flush, and secure.
Drive screws along the second line—ensure they are flush and don’t split the wood.
Optional Upload: Take a photo of your finished board to submit.
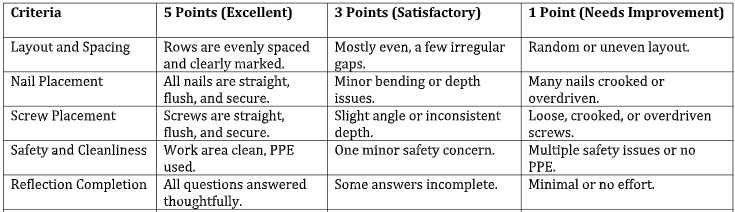
Part 3: Reflection & Self-Evaluation
Answer in your carpentry journal or course platform:
1. What was harder—hammering nails or driving screws? Why?
2. Which fastener do you think gives a stronger hold?
3. What did you learn about spacing, depth, or alignment from this activity?
Review.
Print a photo of your Nail & Screw Practice Board and add to your binder.